
Deep dive language - Java Spring
Here is a some notes to deep dive in Java Spring
1. Spring Framework - Fundamentals:
-
Spring is a framework, including: Spring Data, Spring Microservices, Spring Cloud, Spring Security,…
-
The most important ideas of Spring auto Manage Object by creating, deleling,… instead of developer => Developer only declare Beans and do not need to New, Constructure, Destructure Object.
-
Spring Boot is an annotation-based components to auto configure (configure xml file for Beans,…) of Spring Framework => It can collaborate each Spring Components together.
-
A framework is consider good is:
-
Good to use.
-
Good community.
-
Good documentation.
-
-
IOC (Invertion of Control): Instead of developer control all the objects, delegate the control object for Spring.
-
DI (Dependency Injection): When you need to inject an object to another object => use @Autowired to init the object from bean.
-
Use Spring start to init projects, using IDE like IntelliJ.
2. Spring without Boot
-
Install spring package.
-
Need to declare an “spring.xml” file, declare each
node to Application Context => point to a package className. -
Scope: The default of bean scope is “singleton” => Create bean object when you call new ClassPathXmlApplicationContext(“spring.xml”) => But when you declare the scope to “prototype”, the bean object is created when you init new Student(), new Employee().
-
You can use the
to set value to private variable of the class, value (initial value), ref (@Autowired) -
You also can use
=> Init constructure Student(int age)
-
Use @Override to implement the methods of the interface, using field autowire class -> bean byName or byType if we have 2 concrete class to implement the same interface.
-
Using primary to the class that you want to priority.
-
Lazy init Bean => If you have a Desktop and Laptop Bean to implement interface Computer => By default, it inits 2 beans in initial phrase => But you can use lazy-init to only init a bean when it is declared or autowired.
3. Apply Java-based approach
-
Similar to declare in xml file.
-
@Configuration is declare a config xml.
-
@Bean is declare a bean, can declare “name” of the bean.
-
@Scope to declare different object => use annotation with the same of xml file.
-
@Autowire, @Primary (“desktop” > “computer”), @Qualifier(“desktop” or “laptop”) => mock some fields in Bean.
-
@Configuration > @ComponentScan > @Component => Scan all the @Component to @Configuration => Only create Bean.
-
@Autowired to find the object and inject to the @Bean => Using @Primary or @Qualifier => Both object and setter, getter function.
4. Spring Boot
-
@SpringBoot configure annotations for you.
-
@Configuration
  @ComponentScan(basePackages = "com.example.services")
  @Import({DatabaseConfig.class})
  @PropertySource("classpath:application.properties")
  public class AppConfig {
  }
-
@Service is the same as @Component, but write in layer.
-
@Repository is the same as @Component, but write in layer.
5. Spring JDBC
-
Connect DB, Query database, Keep connection, connect with H2 database.
-
@Autowired for Setter and Getter
-
H2 is just a database, not a cluster => just add JDBC template to query => DSN: jdbc:h2:mem:testdb
-
Apply JDBC template for query db.
-
Add postgres, mysql to resources file => add connection JDBC to database.
6. Build production
-
Java: We build .jar file in local -> Run the .jar file in production.
-
Golang: Build to binary .app -> Run the binary in production.
-
NodeJS: Need to run entry point node index.js.
-
React: Deploy build to CDN -> access index.html to get resources.
7. Java Spring Web, Servlets, JSP and Reactive Programming:
-
Servlets: server handler of Java, that handle request HTTP, each request per a thread, back request need to wait previous requests to completed first => blocking I/O, using Tomcat.
-
Reactive: server handler Java, that handle concurrency project by event loop + callback => non-blocking I/O, using WebFlux.
-
Drawback of Reactive Programming: You’ve built a Spring Boot app using Spring WebFlux (reactive), but your data access layer uses Spring Data JPA, which is blocking => Blocking operations (like JDBC) stall those event loops, which are supposed to stay free and responsive.
-
Reactive apps are built on non-blocking event loops => When a JDBC come to event loop it will stuck the queue => Do not use Reactive Programming for query database.
-
Spring Boot can support both Sevelets (Spring Web) and Reactive (Spring Reactive Web).
-
Tomcat server to run Servlets HTTP, there are: External Tomcat (can use @WebServlets), Embeded Tomcat (add Serlets to Tomcat Server) => addServlets and Servlets Mapping.
-
JSP (Java Server Pages): file .jsp => can use to send HTML to the client - View layer. Serlets is a Controller, Object as Model => Model can come from database or object class (POJO - Plain Old Java Object).
-
Using Tomcat Jasper to convert JSP -> Servlets
-
Use response field of session.getAtrribute and session.setAttribute to bind data to another JSP file.
-
In Spring, you can change HttpServletRequest => parameter, e.g (@RequestParam(“page”) int page, @RequestParam(“limit”) limit int).
-
In Spring, you can change HTTPSession response => Model model or ModelAndView (spring.web.ui -> HTTPSession for JSP) => model.addAtribute(“result”, result) => as long as it contains the same interface.
-
The model can use to addObject model.addObject => And we can use @ModelAttribute to set value for object before assign it to JSP.
-
Using @Configure properties default of Spring Boot => https://docs.spring.io/spring-boot/appendix/application-properties/index.html
Notes:
Why we use Spring MVC rather than Reactive Programming in REST API ?
-
Both WebFlux and WebMVC can do CRUD things.
-
The different is WebMVC the requests are waited the previous requests completed, it execute in order => Reactive Programming WebFlux execute it concurrency => CPU bounded
-
The most important is many essential libraries in the Java ecosystem (e.g., JPA, JDBC, Hibernate, Apache HTTP Client) are blocking => using Reactive Programming cause thread starvation.
8. Spring MVC without Spring Boot:
-
Spring MVC is only a part of Spring Web.
-
Eclipse is free to run Tomcat server. Tomcat is a Servlets Container to run Servlet.
-
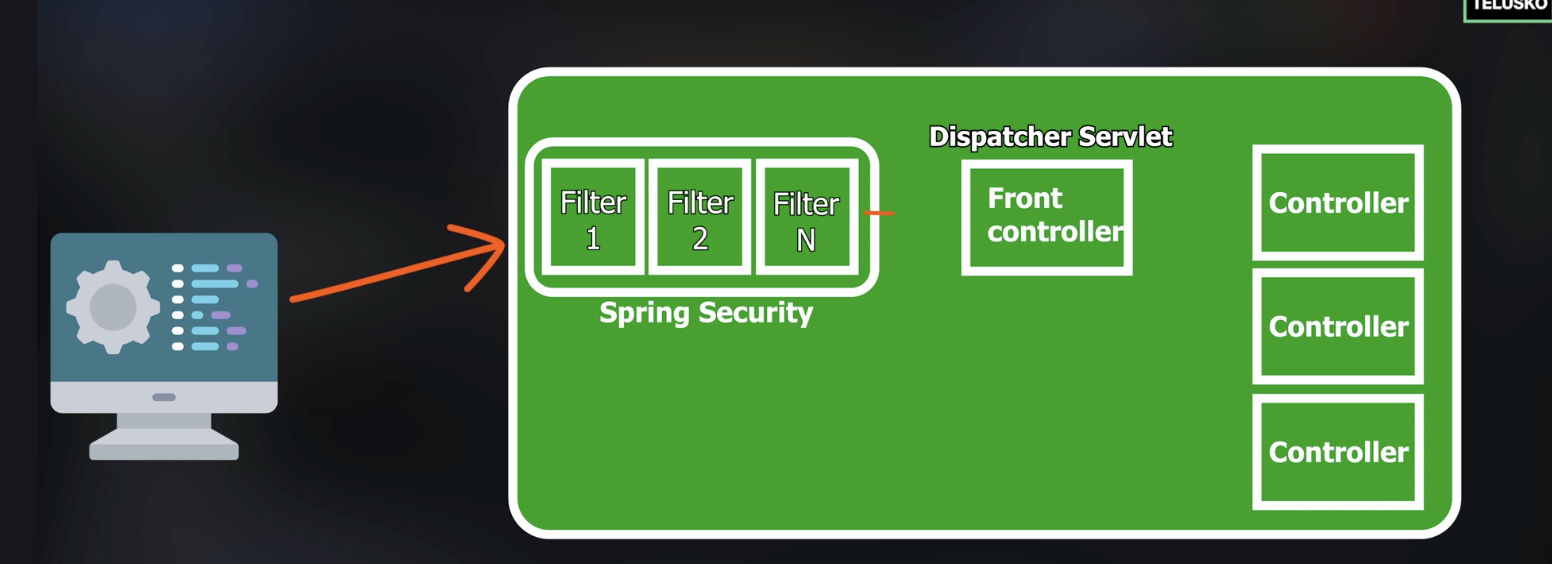
Dispatcher Servlet is a controller -> routing request to other controllers.
-
When to run in Tomcat, you need to define the config
in web.xml. -
It is too much complicated to run Java in Tomcat outside, rather than Tomcat embedding.
9. Spring Data JPA:
-
ORM to help query database, abstract in repository layer.
-
You can custom SQL for the repository layer.
-
You name the function findUsernameById => JPA is auto know to implement this function to find by id.
10. Spring Data REST
- Use annotation @Repository, or @RepositoryRestResource(path = “members”) to generate CRUD api with repository.
@RepositoryRestResource(path = "members")
public interface UserRepository extends JpaRepository<User, Long> {
11. Spring AOP (Aspect of Programming)
-
Instead of writing duplication in code: logging, validation, exception for each function in code => We can use Spring AOP to centralize the handling exception to another place.
-
Using @Aspect in a class LoggingAspect to assign it as an Aspect Class.
-
Before Advice: using @Before(“execution* com. telusko-springboatrest service.JobService.updateJob(..))”) in the function call -> To make it call before everything function JobService execute.
-
Join Point: Can print the function that you called.
-
After Advice: @After, @AfterThrowing, @AfterReturning
-
Around Advice: using to PerformanceMonitoringAspect -> time execution of the function
@Around ("execution (* com. telusko seningbeatrest service.JobService. getJob(..))")
public void monitorTime (ProceedingJoinPoint jp) throws Throwable {
    long start = System.currentTimeMillis(); I
    const obj = jp.proceed();
    Long end = System.currentTimeMillis();

    LOGGER.info("Time taken : " + (end-start));

    return obj;
}
- Around: using in ValidationAspect to using with argument
@Around ("execution (* com.telusko-spcingbaatrest.service.JobService.getJob(..)) && args(postId)")
public Object validateAndUpdate(ProceedingJoinPoint jp, int postld) throws Throwable {
  if (postId < 0) {
     postId = -postId;
  }

  const obj = jp.proceed(new Object[]{postId});

  return obj;
}
Notes: It run function in @Around before executing function later or always check the validation, if it failed the Aspect function will throw error.
12. Spring Security
- User data is important, some data if leaked, you can blocked from the hacker such as credit cards. But some data if it’s gone, it’s gone, e.g. medical records, customer data.
-
Notes: Client -> Security Filters -> Filter Chain -> Servlet Filters (in order).
-
After login -> Create session ID -> use to access resource -> Write JSESSIONID to cookie to make other requests.
-
To get the session from request, we use HttpServletRequest to get session id.
@GetMapping("hello")
public String greet(HttpServletRequest request) {
  return request.getSession.getId();
}
- You can define you own username, password in resources, application.properties with variable spring.security.user.name và spring.security.user.password.
Basic Auth - Username, Password
-
When you submit a request, you send a token but not username, password -> Because username, password is leakable -> using token is more secure.
-
Declare new object, e.g new Student(), List
in Java Spring -> It is just a memcache, and class are the dto. -
CSRF (Cross-site Request Forgery) is a token -> prevent website in other domain, such as: facebook.com -> share cookie to .zalopay.vn domain -> Use CSRF do make sure cookie is not share to other domain.
-
By default, Spring Security required to add CSRF token to POST, PUT, DELETE API => Else it will return 401, it means that Spring Security required users to add X-CSFF-TOKEN to the header requests of API.
-
You can use same.site.strict in application.properties -> to make sure it only can share cookie in same site.
-
2 types of REST API: Stateless and Stateful -> /about, /students same token -> it is stateful (for sessionID in cookie)
-
Notes: If you are implement stateful API -> You need to maintain CSRF token to send with session ID, it means that although they have cookie, but not have token, it is not success to POST, PUT, DELETE resource.
-
Notes: If SameSite=Strict or SameSite=Lax cookies: Prevent cookies from being automatically sent in cross-site requests.
-
@Configuration and @Bean different -> @Configuration is a Singleton Bean.
-
Notes: By default, Spring Security has default config for you, but if you declare SecurityConfig with @Configuration and @EnableWebSecurity, you overwrite the config => use @Configuration to overwrite the default config or define in application.properties.
@Configuration
@EnableWebSecurity
public class SecurityConfig {
  @Bean
  public SecurityFilterChain securityFilterChain(HttpSecurity http) throws Exception {

    http.csrf(customizer -> customizer.disable());
    http.authorizeHttpRequests(request -> request.anyRequest() .authenticated());|
    http.httpBasic(Customizer.withDefaults());
    http.sessionManagement(session -> session.sessionCreationPolicy(SessionCreationPolicy.STATELESS)

    // Stateless you need to send request from the client every requests and do not need form
    return http.build()
  }
-
Each request must contain all the information needed to process it. The server does not store session state between requests. Therefore, no session-based login -> no need for login form.
-
You can customize the http.csrf interface by using without lambda interface and @Overwrite the functions -> Lambda function make write the interface of java class easier.
  Customizer<CsrfConfigurer<HttpSecurity>> customCsrf = new Customizer<CsrfContigurer<<HttpSecurity>> {
      @Override
      public void Customize(CrfConfigurer<HttpSecurity> configurer) {
        configurer.disable();
      }
  }:

  http.csrf(custCsrf);
- You can use Lambda function to write the filters, interceptors more cleaner
@Configuration
@EnableWebSecurity
public class SecurityConfig {
  @Bean
  public SecurityFilterChain securityFilterChain(HttpSecurity http) throws Exception {
    http.csrf(customizer -> customizer.disable())
        .authorizeHttpRequests(request -> request.anyRequest() .authenticated())
        .httpBasic(Customizer.withDefaults())
        .sessionManagement(session -> bession sessionCreationPolicy(SessionCreationPolicy.STATELESS));

    return http.build()
  }
- If you use basic authenticate with HTTP, it will display a prompt to input value in browser.
-
Login with multiple users -> Database.
-
Notes: Using UserDetail Service. We can return an object to implement the interface or an abstract class that implement the interface.
@Bean
public UserDetailsService userDetailsService() {
  UserDetails user = User.withRefaultPasswerdEncoder().username("navin").password("n@123").roles("USER").build();

  UserDetails admin = User.withRefaulthasswerdEncoder().username("admin").password("admin@789").roles("ADMIN").build();

  return new InMemoryUserDetailsManager (user, admin);
}
-
You can store data in MYSQL using JDBC, JPA -> load data to userdetail interface for authenticate users.
-
Notes: Filters/Interceptors are executed in order.
-
Notes: You can implement the userDetailService in your own with your database.
@Configuration
@EnableWebSecurity
public class SecurityConfig {
  @Autowined
  private UserDetailsServive userDetailsService;

  @Bean
  public AuthenticationProvider authProvider(){
    DaoAuthenticationProvider provider = new DaoAuthenticationProvider();

    provider.setUserDetailsService(userDetailsService);
    provider.setPasswordEncoder(...);

    return provider;
  }
}
- Implement the UserDetail Service and UserRepository.
public interface UserRepo extends JpaRepository<User, Integer> {
  User findByUsername(string username)
}
@Service
public class MyUserDetailsService implements UserDetailsService {
  @Autowined
  private UserRepo repo;

  @Override
  public UserDetails loadUserByUsername(String username) throws UsernameNotFoundException {
    User user = repo.findByUsername(username);

    if (user == null) {
      System.out.println("User 404");
      throw new UsernameNotFoundException ("User 404");
    }

    return new UserPrincipal(user)
  }
}
public class UserPrincipal implements UserDetails {
  private User user;

  public UserPrincipal(user UserRepository) {
    this.user = user;
  }

  @Override
  public Collection<? extends GrantedAuthority> getAuthorities() {
    return Collections.singleton(new SimpleGrantedAuthority(role: "USER"));
  }

  @Override
  public String getPassword() {
    return user.getPassword()
  }
Encoding Password
-
Hashing Algorithm: MD5 (128 bit), SHA256 (256 bit) -> Hash with multiple rounds -> Hash 1 time.
-
Bcrypt -> hash 256 bit + salt multiple times.
-
Using Bcrypt to encode when register new user when create/update user.
-
You can use BScrypt to implement in PasswordEncoder of UserDetail service and when store to database -> Because it tell the Spring Boot to verify 2 passwords during login by comparing the raw password -> encoded password and compare this password in the database (compare 2 hashing password)
Cross Origin
-
Using @CrossOrigin(“http://localhost:3000”) => Allow the origin “http://localhost:3000 to call API to http://localhost:8080 => Different Port is different origin.
-
Password is decoded in the same server -> Only using salting is enough.
Encoding Token (JWT and OAuth2)
-
When data send from A to B -> We need symetric key and asymetric key (private and public key) -> to encrypt and decrypt the sensitive data to protect from man of the middle attack.
-
Man of the middle attack can happen every where in the Internet -> Modify payload in the middle when server A send to server B.
-
Symetric key:
- Faster
- But A -> B using K1, A -> C using K2, A -> D using K3,…is very difficult to manage all the keys for A.
-
Notes: Algorithm to encrypt and decrypt symetric key, AES: Advanced Encryption Standard, DES: Data Encryption Standard.
-
Asymetric Key (Public key and private key)
- Encrypt data with Private Key -> Decrypt data with Public Key.
- Encrypt data with Public Key -> Decrypt data with Private Key.
-
Notes: All public key is shared in repository for everyone.
-
Question 1: Flow A send data to B.
-
A use public key of B to encrypt data.
-
B use private key of B to decrypt data.
-
-
Notes: Algorithm to encrypt and decrypt asymetric key -> RSA (Rivest, Shamir, Adleman), ECC.
-
Notes: But the problem is C can catch the message of A -> using B public key to send data to B => We need to prove the data is come from the sender (A)
-
Digital Signature: How to verify the person who send the message is A
-
Question 2: How B to know data send from A:
-
A use private key of A to encrypt the data and send the digital sigature to B.
-
B use A public key -> to decrypt the payload of digital sigature from A -> Make sure the payload is send from A
-
Problem: But C can use A public key to decrypt the data.
-
-
Question 3: The best solution.
-
A use public key of B to encrypt the data in step 1.
-
In step 2, A use private key of A to encrypt the payload in step 2.
-
If C can receive the payload, C can only see the encrypt message + data come from A.
-
When data send to B, B use public key of A -> verify the message is come from A.
-
B use private key of B -> to read the data.
-
-
SSL Handshaking:
-
Client say hello + client random to server
-
Server response hello + server random + public key server to client
-
Client use public key server + send “premaster secret” to Server
-
Server use private key server to encrypt the “premaster secret” -> response to client.
-
Create a session_key = client random + server random + “premaster secret”
-
Client send “session_key” to server
-
Server response ok for the “session_key”
-
JWT (JSON Web Token)
-
Idea: you have an ID to a branch of the coffee -> Cashier check the book and provide coffee for your membership -> But when the coffee has a new branch and they do not have a book, they can not know your membership info.
-
Solution step 1: Give you a card that can bring to every branch no matter the location.
-
But other people can clone the credit card, how can you solve ?
-
Solution step 2: The card is signed/issued by manager and after that, it is valid.
-
Notes: Static page do not need to authenticate, but if they have data from the database -> Must be authenticated.
-
Notes: Can not use a JSESSIONID from Spring Security because JSessionID is belong to 1 server -> If you have multiple server, it can not very it all because each server have a different JSESSIONID when start the service.
-
Solution: You can use a sticky session to assign client A to a server A, client B to server B or use to verify user data in the shared database.
-
You can use HS256 (Synmetric) to sign 1 token, or using RSA (Asynmetric) to sign 2 token.
-
Notes: People can decode your payload -> Do not send sensitive data to payload.
    http.cSrf(customizer -> customize.disable())
    .authorizeHttpRequests(request -> requestrequestMatchers("register").permitAll())
    .anyRequest().authenticated()
    .sessionManagement(session -> session.sessionCreationPolicy(SessionCreationPolicy.STATELESS)
- Custom Login using AuthenticateManager
@PostMapping("login")
public String login(@RequestBody User user){

  Authentication authentication = authenticationManager.authenticate(new UsernamePasswordAuthenticationToken(user.getUsername(), user.getPassword()));

  if (authentication. isAuthenticated()) {
    return "Success" ;
  }
  else {
     return "Login Failed";
  }
}
- You can use .addFilterBeforejwtFilter(jwtFilter, UsernamePasswordAuthenticationFilter.class) to add custom filter in middleware
@Override
protected void doFilterInternal(HttpServletRequest request, HttpServletResponse response, FilterChain filterChain) throws ServletException, IOException {
  String authHeader = request.getHeader("Authorization");
  String token = null;

  String username = null;
  if (authHeader != null && authHeader.startsWith("Bearer ")) {
    token = authHeader.substring(7);
    username = jwtService.extractUserName(token);
  }

  if (username != null && SecurityContextHolder.getContext().getAuthentication() == null) {
      // Check logic here
      UserDetails userDetails = context.getBean(UserDetailsService.class).loadUserByUsername(username);
  }

  if (jwtService.validateToken(token, userDetails)) {
      UsernamePasswordAuthenticationToken authentication = new
      UsernamePasswordAuthenticationToken(userDetails, null, userDetails.getAuthorities());
      authentication.setDetails(new WebAuthenticationDetailsSource().buildDetails(request));
      SecurityContextHolder.getContext().setAuthentication(authentication);
  }
  filterChain.doFilter(request, response);
}
-
OAuth2
-
OAuth with Google
@Configuration
@EnableWebSecurity
public class SecurityConfig {
    @Bean
    public SecurityFilterChain defaultSecurityFilterChain(HttpSecurity http) throw Exception {

      http.authorizeHttpRequests(auth -> auth.anyRequest()).authenticated()
          .oauth2Login(Customizer.withDefaults());

      return http.build;
    };
};
spring.security.oauth2.client.registration.google.client-id=
spring.security.oauth2.client.registration.google.client-secret=
- If you want to OAuth By Github, change the environment key
spring.security.oauth2.client.registration.github.client-id=
spring.security.oauth2.client.registration.github.client-secret=
13. Spring Cloud
- Use
mvn packageto create file .jar in target folder.
mvn package
-
Create User Group -> IAM Account.
-
Upload .jar file to AWS Beanstalk -> Choose EC2 and policy -> Host it to EC2.
-
Create database cluster RDS in AWS
spring.datasource.url=jdbc:postgresql://my-db.czkygsqeesi2.us-east-1.rds.amazonaws.com:5432/telusko
spring.datasource.username=postgres spring.datasource.password=12345678
spring.datasource.password=
-
You can use ECS to run serverless
-
Pull posgresql in Dockerhub and run the task: Create cluster (run in EC2, or Fargate Serverless) -> Create task (task is create a job to pull image docker + export port -> build docker and docker-compose file) -> Task can use to run any docker image.
Process:
-
ECR: Push the dockernize service to ECR.
-
ECS: Create cluster, and task -> In the task, pull the image from ECR or dockerhub to run.
Docker
-
Notes:
- Dockerfile: Run 1 service in a container.
docker run my-image
- docker-compose.yml: use to run multiple containers.
docker-compose up
- When to run docker execute container-id, it runs the CMD in Dockerfile
docker execute container-id
CMD ["npm", "start"]
Microservices
-
Service Discovery (Eureka Server - Netflix): Find the location of question service.
-
Service A, Service B: Eureka Client
-
Service Discovery: Eruka Server
-
@SpringBootApplication
@EnableEurekaServer
public class ServiceRegistryApplication {
  public static void main (String[] args) {
    SpringApplication.run(ServiceRegistryApplication.class);
  }
}
spring.application.name=service-registry
server.port=8761

eureka.instance.hostname=localhost
eureka.client.fetch-registry=false
eureka.client.register-with-eureka=false
- HTTP Client (Feign Client)
@FeignClient ("QUESTION-SERVICE")
public interface QuizInterface {
  @GetMapping("generate")
  public ResponseEntity<List<Integer>> getQuestionsForQuiz(@RequestParam String categoryName, @RequestParam Integer numQuestions);
}
@Service
public class QuizService {
  @Autowired
  QuizDao quizDao;

  @Autowired
  QuizInterface quizInterface;

  public ResponseEntity<String> createQuiz(String category, int numQ, String title) {
      List<Integer> questions = quizInterface.getQuestionsForQuiz(category, numQ.getBody();

      Quiz quiz = new Quiz();
      quiz.setTitle(title); I
      quiz.setQuestionIds(questions) ;
      quizDao.save(quiz);
    }
  }
@SpringBootApplication
@EnableFeignClients
public class QuizServiceApplication {
  public static void main (String[] args) {
    SpringApplication.run(QuizServiceApplication.class, args);
  }
}
-
In addition, you can use HTTPClient, OkHttpClient to make requests as an HTTP client in Java.
-
Load balacing: 1 service have multiple instances -> point of view is about only 1 service.
-
API Gateway: Routing multiple services -> point of view is about multiple services => You can deploy service for API Gateway from @Gateway package of Spring.
spring.application.name=api-gateway
server.port=8765

sprina.cloud.aatewav.discovery.locator.enabled=true
spring.cloud.gateway.discovery.locator.lower-case-service-id=true
Flow: Client -> API Gateway -> Euruka Server
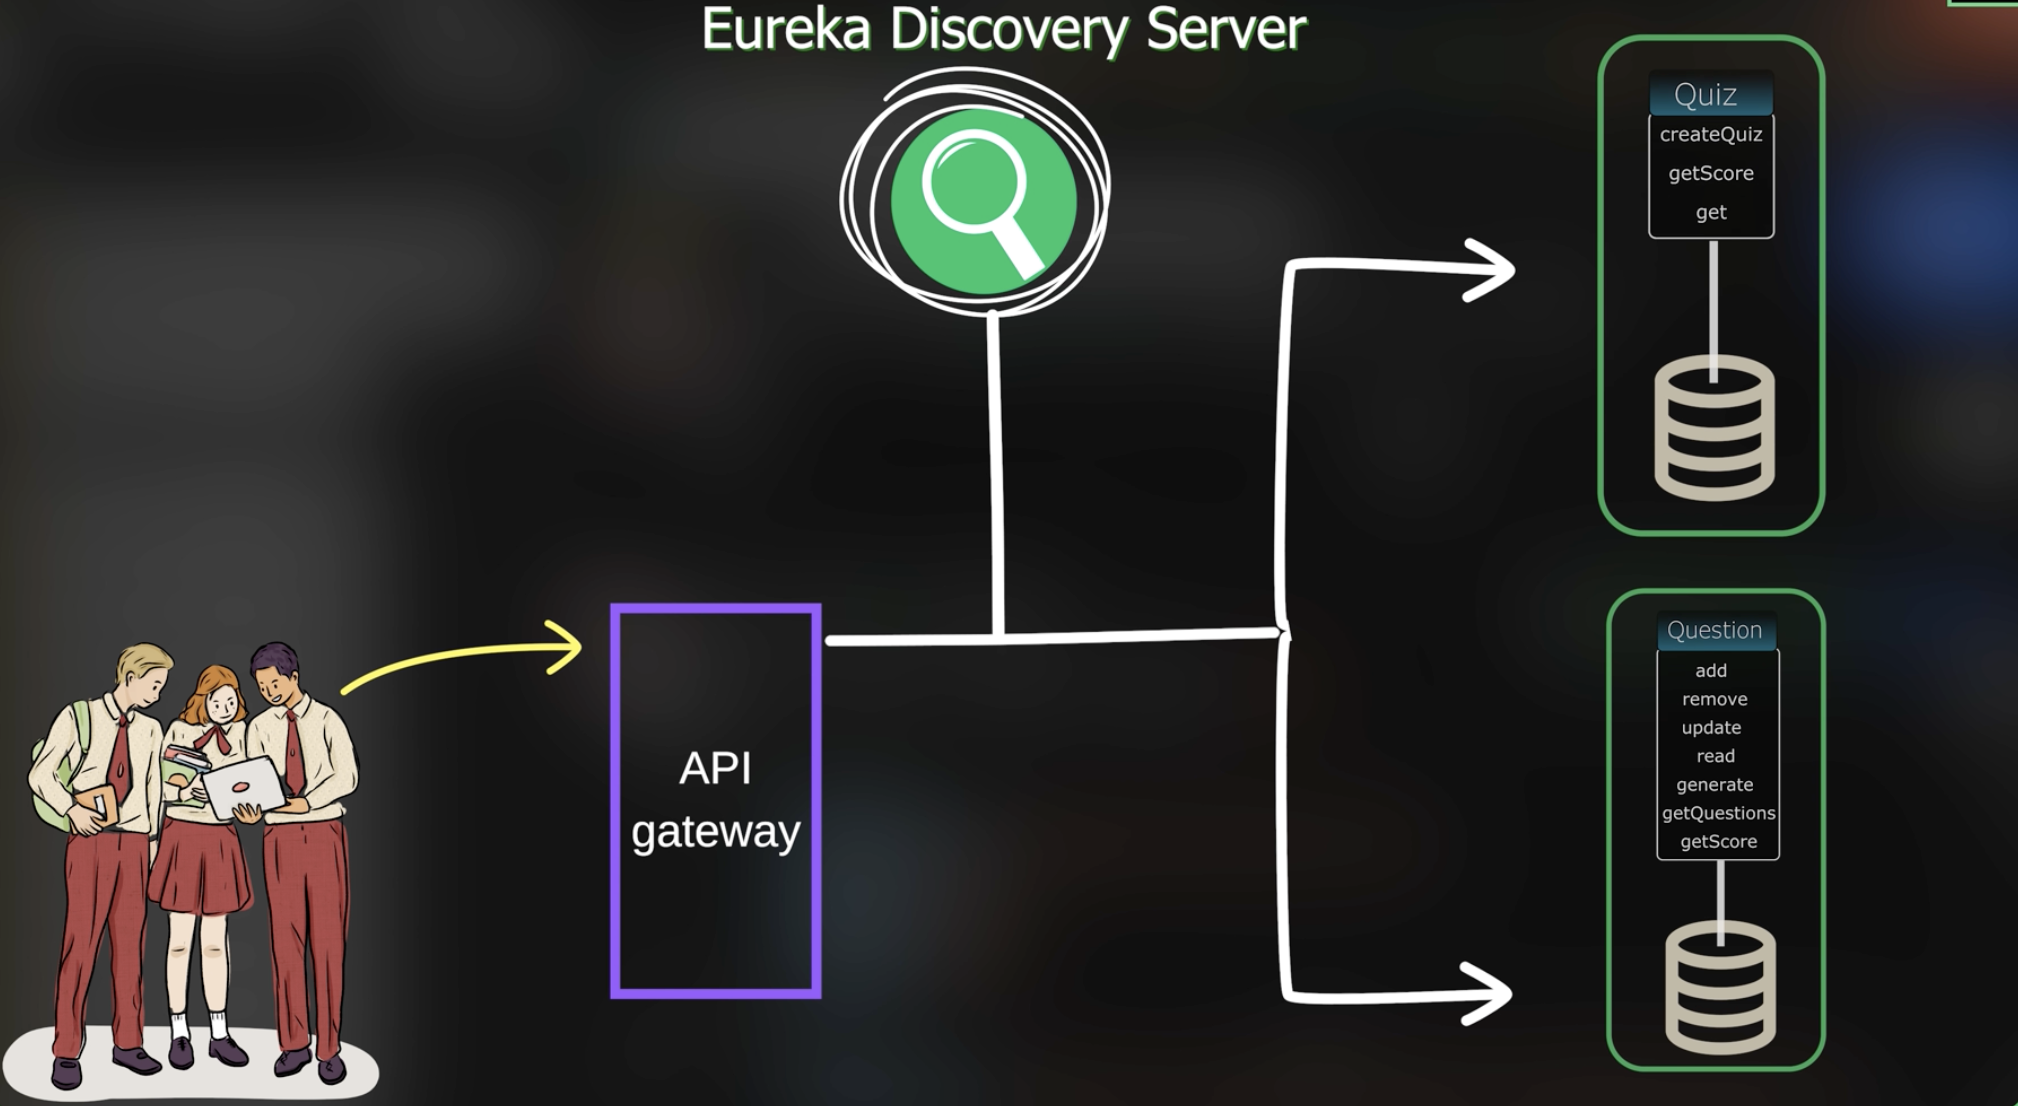
- Notes: The magic in API Gateway is here
GET: http://localhost:8765/QUIZ-SERVICE/quiz/get/2 -> Routing to QUIZ-SERVICE

14. Spring AI
-
Because interface in OpenAPI and Anthropic is different -> We need Spring AI work as an abstract layer to interact with multiple models.
-
Add Spring AI dependencies and properties
spring.application.name=SpringAICode
spring.ai.openai.api-key=
- Using chatModel: Inject the openAPIService to service controller
@RestController
public class OpenAIController {
  private OpenAiChatModel chatModel;

  public OpenAIController(OpenAiChatModel chatModel)(
    this.chatModel = chatModel;
  }

  @GetMapping ("/api/(message}")
  public String getAnswer (@PathVariable String message) {
    String response = chatModel.call(message); I
    return response;
  }
}
-
Using chatClient: can connect with multiple chat model, stream messages response.
-
Notes: Define interface match with constructor on OpenAiChatModel in ok, to declare an variable in class -> Use Constructor or @Autowired.
-
Using history context, because when user prompt “More” => It need to history context to remember history chat.
-
You can use Spring AI Memory Advisor to cache the history context of users.
public OpenAIController (ChatClient.Builder builder){
    this.chatClient = builder.defaultAdvisors (new MessageChatMenpryAdvisor(new InMemoryChatMemory)).build();
}
- Run model with Ollama, by addding Ollama controller
@RestController
public class OllamaController {
  private ChatClient chatClient;

  public OllamaController(OllamaChatModel chatModel) {
    this.chatClient = ChatClient.create(chatModel);
  }
}
spring.ai.ollama.chat.options.model=deepseek-r1:7b
- Prompt Template: Use it to send a prompt from params of client
@PostMapping("/api/recommend")
public String recommend(@RequestParam String type, @RequestParam String year, @RequestParam String Lang) {
  String temp = """
      I want to watch a {type} movie tonight with good rating, looking for movies around this year {year}.
      The language im looking for is {lang}.
      Suggest one specific movie and tell me the cast and length of the movie.

      Response format should be:
      1. Movie name
      2. basic plot
      3. cast
      4. length
      5. IMDB rating
  """

  PromptTemplate promptTemplate = new PromptTemplate(temp);
  Prompt prompt = promptTemplate. create(Map.of(k1: "type", type, k2: "year", year, k3: "Zang", Lang));

  String response = chatClient.prompt(prompt).call().content();

  return response;
}
Embedding
-
Definition: The way to change from: Text, Image, Audio -> Binary vector
-
Dimension of the vector -> similar parameter to make the 2 objects are close together.
-
When you submit a text, image, audio -> It converts to an embedding vector.
-
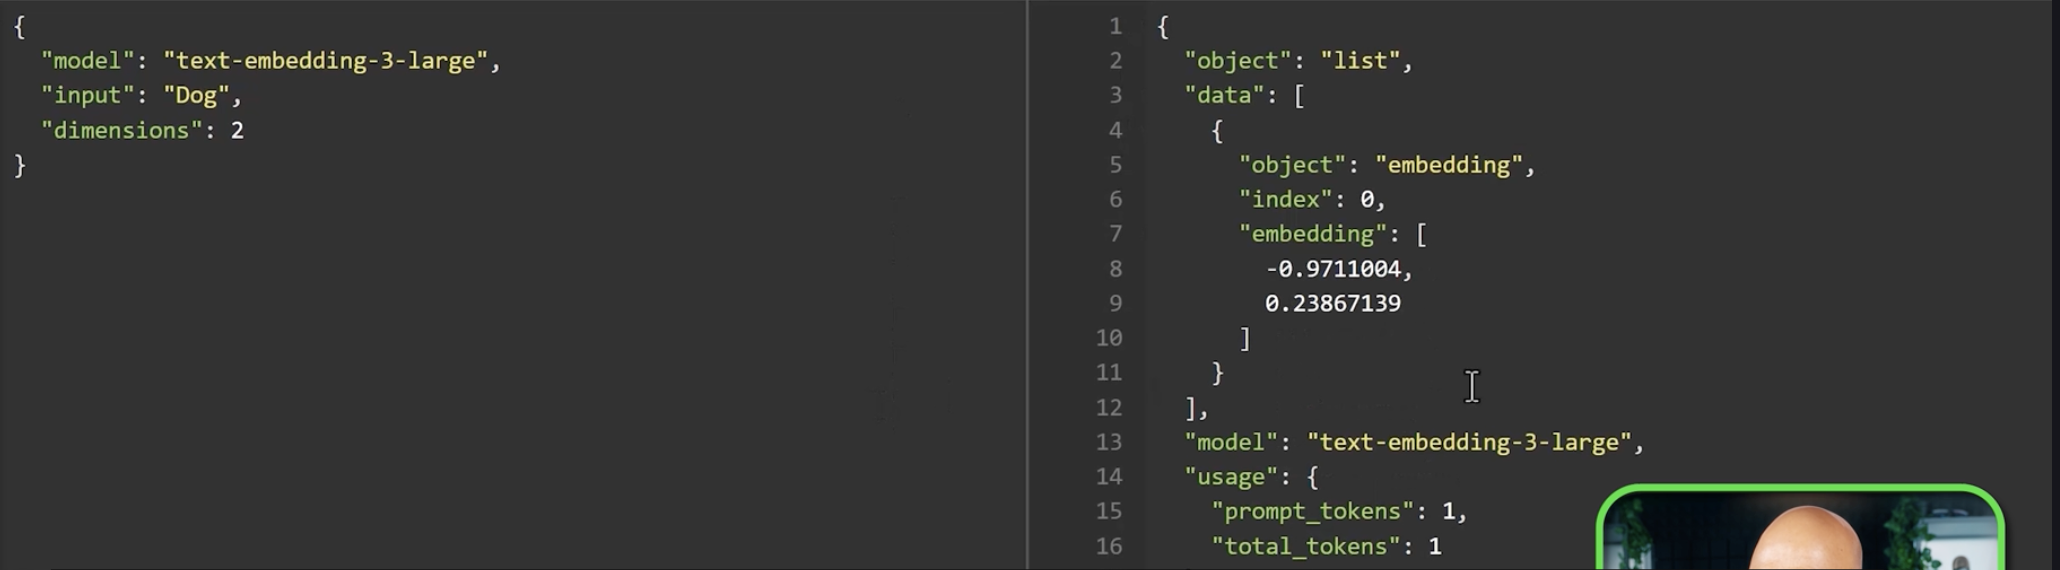
Notes: You can limit the dimensions that you want to work, the embedding result is depended on model type.
POST: https://api.openai.com/v1/embeddings

body: {
    "model": "text-embedding-3-large",
    "input": "Dog",
    "dimensions": 2
}
- Embedding using Spring AI
@Autowired
@Qualifier("openAiEmbeddingModel")
private EmbeddingModel embeddingModel;
spring.api.openai.embedding.options.model=text-embedding-3-large
- Calculate similarity
@PostMapping("/api/similarity")
public double getSimilarity(@RequestParam String texti, @RequestParam String text2){
  float[] embedding1 = embeddingModel.embed(text1);
  float [] embedding2 = embeddingModel.embed(text2);

  double dotProduct = 0;
  double norm1 = 0;
  double norm2 = 0;

  for(int i = 0; i < embedding1.length; i++){
      dotProduct += embedding1[i] * embedding2[il; norm1 += Math.pow(embedding1[i], 2);
      norm2 += Math.pow(embedding2[i], 2);
  }

  return dotProduct / (Math.sqrt (norm1) * Math.sqrt (norm2)) ;
}
- Vector Store
@Configuration
public class AppConfig {
  public VectorStore vectorStore(EmbeddingModel embeddingModel){
    return SimpleVectorStore.builder(embeddingModel).build();
  }
}
@Component
public class DataInitializer {

  @Autowired
  private VectorStore vectorStore;

  public void initData(){
      TextReader textReader = new TextReader(new ClassPathResource("product_details.txt"));

      TokenTextSplitter splitter = new TokenTextSplitter();

      List<Document> documents = splitter.split(textReader.get());

      vectorStore.add(documents);
  }
};
@PostMapping("/api/product")
public List<Document> getProducts(@RequestParam String text){
    return vectorStore.similaritySearch(SearchRequest.builder().query(text).topK(2).build());
}
- Posgres Vector Store
@Configuration
public class AppConfig {
  @Bean
  public VectorStore vectorStore(JdbcTemplate jdbailemplate, EmbeddingModel embeddingModel) {
    return PgVectorStore.builder(jdbcTemplate, embeddingModel)
                        .dimensions(1536)
                        .build();
  }
}
- Redis Vector Store use by index and prefix to search.
- Using RAG: Inject vector db to model, the LLM will find data in vector db and response.
@PostMapping("/api/ask")
public String getAnswerUsingRag (@RequestParam String query) {
    return chatClient.prompt(query)
                     .advisors(new QuestionAnswerAdvisor(vectorStore))
                     .call()
                     .content();
-
Image Model
-
Using OpenAIImageModel to gen the image
@RestController
public class ImageGenController {
  private ChatClient chatclient;
  private OpenAiImageModel openAiImageModel;

  public ImageGenController(OpenAiImageModel openAiImageModel, ChatClient.Builder builder){
    this.openAiImageModel = openAiImageModel
    this.chatClient = builder.build();
  }

  @GetMapping ("image/{query}")
  public String genImage(@PathVariable String query) {
    ImagePrompt prompt = new ImagePrompt(query, OpenAiImage0ptions.builder()
                             .quality("hd")
                             .height(1024)
                             .width(1024)
                             .style("natural")
                             .build());

    ImageResponse response = openAiImageModel.call(prompt);

    return response.getResult().getOutput().getUrl();
  }

  @PostMapping ("image/describe")
  public String descImage(@RequestParam String query, @RequestParam MultipartFile file){
    return chatClient.prompt.user((PromptUserSpec) us -> us.text(query)
                            .media(MimeTypeUtils.IMAGE_JPEG, file.getResource()))
                            .call()
                            .content();

  };
-
Audio: Speech to Text (Transcription), Text to speech.
-
Model speech to text:
@RestController
public class AudioGenController {
  private OpenAiAudioTranscriptionModel audioModel;

  public AudioGenController(OpenAiAudioTranscriptionModel audioModel){
    this.audioModel = audioModel;
  }

  @PostMapping ("api/stt")
  public String speechToText(@RequestParam MultipartFile file){

    OpenAiAudioTranscriptionOptions options = OpenAiAudioTranscriptionOptions.builder()
                                                        .language("es").
                                                        responseFormat(OpenAiAudioApi. ranscriptResponseFormat.SRT)
                                                        .build();

    AudioTranscriptionPrompt prompt = new AudioTranscriptionPrompt(file.getResource(), options);

    return audioModel.call(prompt).getResult().getOutput();
  }
}
- Model text to speech:
@RestController
public class AudioGenController {
  private OpenAiAudioTranscriptionModel audioModel;
  private OpenAiAudioSpeechModel audioSpeechModel;

  public AudioGenController (OpenAiAudioTranscriptionModel audioModel, OpenAiAudioSpeechModel audioSpeechModel){
    this.audioModel = audioModel;
    this.audioSpeechModel = audioSpeechModel;
  }

  @PostMapping ("api/tts")
  public byte[] tts(@RequestParam String text) {
    OpenAiAudioSpeechOptions options = OpenAiAudioSpeechOptions.builder()
                                                               .speed(1.5f)
                                                               .voice(OpenAiAudioApi. SpeechRequest.Voice.NOVA)
                                                               .build();

    SpeechPrompt prompt = new SpeechPrompt(text, options);

    return audioSpeechModel.call(prompt).getResult().getOutput();
  }
}
- Finally, you should convert the response to JSON (can declare a BeanConverter).